Timing, Transitions & Precedent
It is often said that good lighting is as much about timing as anything else so it is important to understand the concepts of timing and transitions used throughout Designer:
Timing
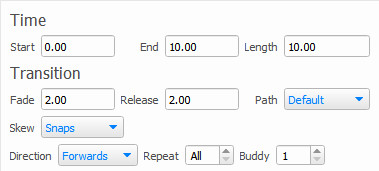
Timing values pertain to presets placed on timelines and determine the Start, End and Length times and may be numerically set as an alternative to dragging.
Transition timing
Transition values pertain to presets placed on timelines and determine what sort of cross fade is rendered. The use of interesting transitions can transform your project so it is well worth spending some time experimenting to see what can be achieved using these properties:
Fade
Sets the overall length of the transition, default value is 2 seconds.
Release
Sets the time used for a preset to “release” its fixtures when it completes, default value is 2 seconds. This value is not used if another preset is placed on the timeline immediately after this one - in that case the fade time of the second preset will be preferred.
Path
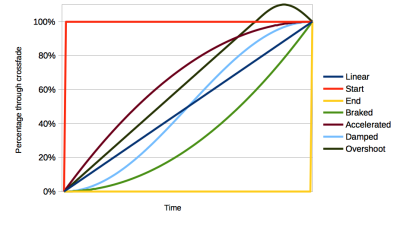
Specifies the cross fade path, default is Default meaning that each pixel or parameter will use the library default path (or Dimmer Curve if specified), typically Linear for intensity/position and Start for colour/gobo wheels. A variety of paths are provided which provide overall crossfade paths.
Additional paths add the ability to specify the order that colour and intensity channels crossfade in, such that the colour can fade then the intensity, for example.
- Col at Start
- Col at End
- Int at Start
- Int at End
- Colour First
- Intensity First
Viewing Transitions 

The View Transitions button can be used to display the transitions for each preset on the timeline.
Transition Skews
Skews are transitional effects that can be applied to the fade-in time for built-in presets (1D & 2D). Skews work by changing (or skewing) the timings when the fade-in is applied to groups and arrays of fixtures, thereby creating a variety of possible transition effects. Each skew type will affect both how the fade effect applies to each fixture, and how it propagates through the group or matrix.
There are two completely separate lists of available skew types for 1D and 2D built-in effects.
Group & Scenes (1D)
Skew types applied to 1D built-in presets work by propagating through a group's list of fixtures. The effects will propagate across the group's list order end-to-end, so it is important to pay close attention to the fixture-listing-order within each group to ensure the skew transition applies as desired.
Skew Type
Using skews with 1D built-in presets can create "multi-part" fades so that fixtures and elements fly into the scene at different speeds. The skew type and fade time can allow fixtures to come on from as slow as one by one, all the way to a smooth fade in across them all.
None
The default skew type is None which causes all the fixtures/elements to fade in together over the course of the fade time. Each subsequent skew type will bring each fixture within a group online at an increasing speed, see below for more details:
Snaps
As the name suggests each fixture will snap from 0% (off) to 100% (on) instantly in turn, the skew propagates down the list of fixtures one-by-one. When there are fewer fixtures within a group this skew type is very effective at bringing online each fixture one-by-one. The fewer the fixtures, and the longer the fade time (and duration of the built-in preset on the timeline), the more dramatic the effect will be.
Individually
This skew type gradually fades each fixture from off to on individually. The effect propagates down the fixture group each fixture in turn. Similarly to snaps this skew works effectively with fewer fixtures that are to be brought online one-by-one but with an added fade-in effect.
Note: the Snaps and Individually skew types complete on a single fixture before starting on the next. If there are many fixtures over a short fade time the two effects will be indistinguishable as the effect has to propagate too quickly to reveal the fade effect of the Individually skew type.
Wave, Staggered, Spread, and Multispeed
These 4 Skew types propagate through a list of grouped fixtures at varying rates thereby producing different fade-in effect across the affected fixtures. The visual difference between each Skew relates to how many of the fixtures in the group are actively fading-in at the same time as well as at what rate.
The effects of each Skew are best demonstrated by the below graphic showing the 4 Skews applied to a 10s fade-in effect.
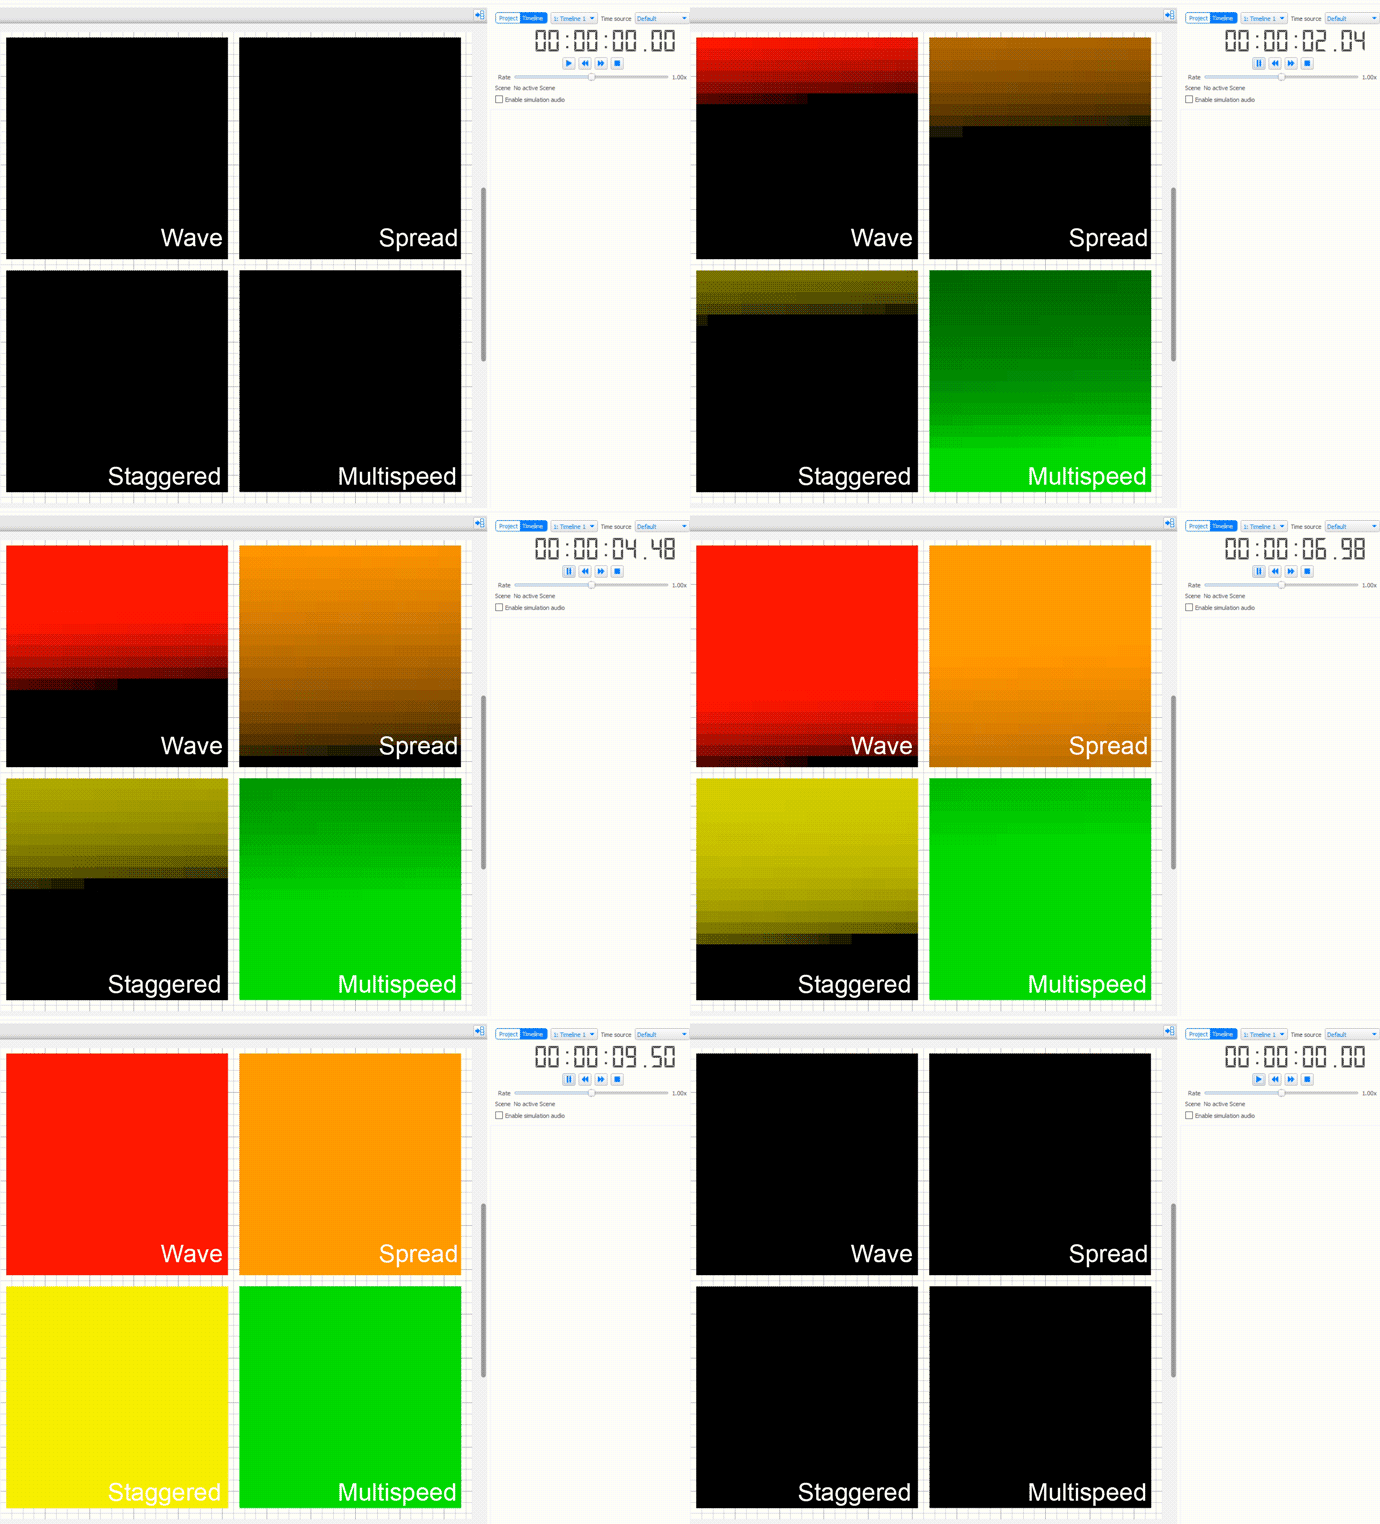
Below is a more technical overview for each Skew covering what is happening to each fixture's fade within the affected group.
NOTE: With these transitions we highly recommend experimenting using Simulate as the results can often be surprising. The Skew feature is also greatly enhanced when paired with the Direction.
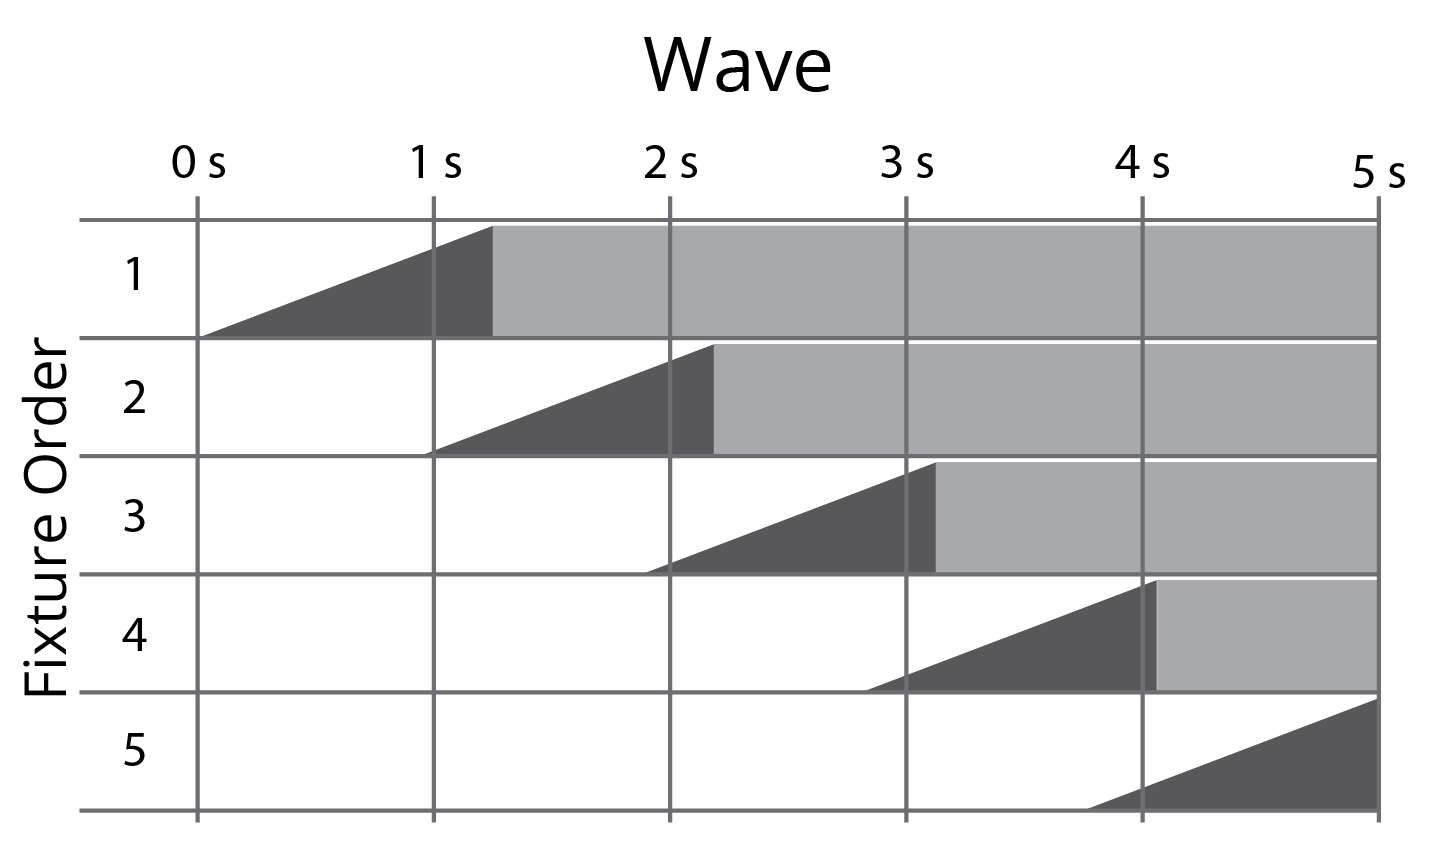
For Wave, the fade-in time for all fixtures within the affected group is equal to a quarter of the set total fade time. This will typically produce an effect similar to a wipe transition with a narrow band of fixtures that change at the same time.
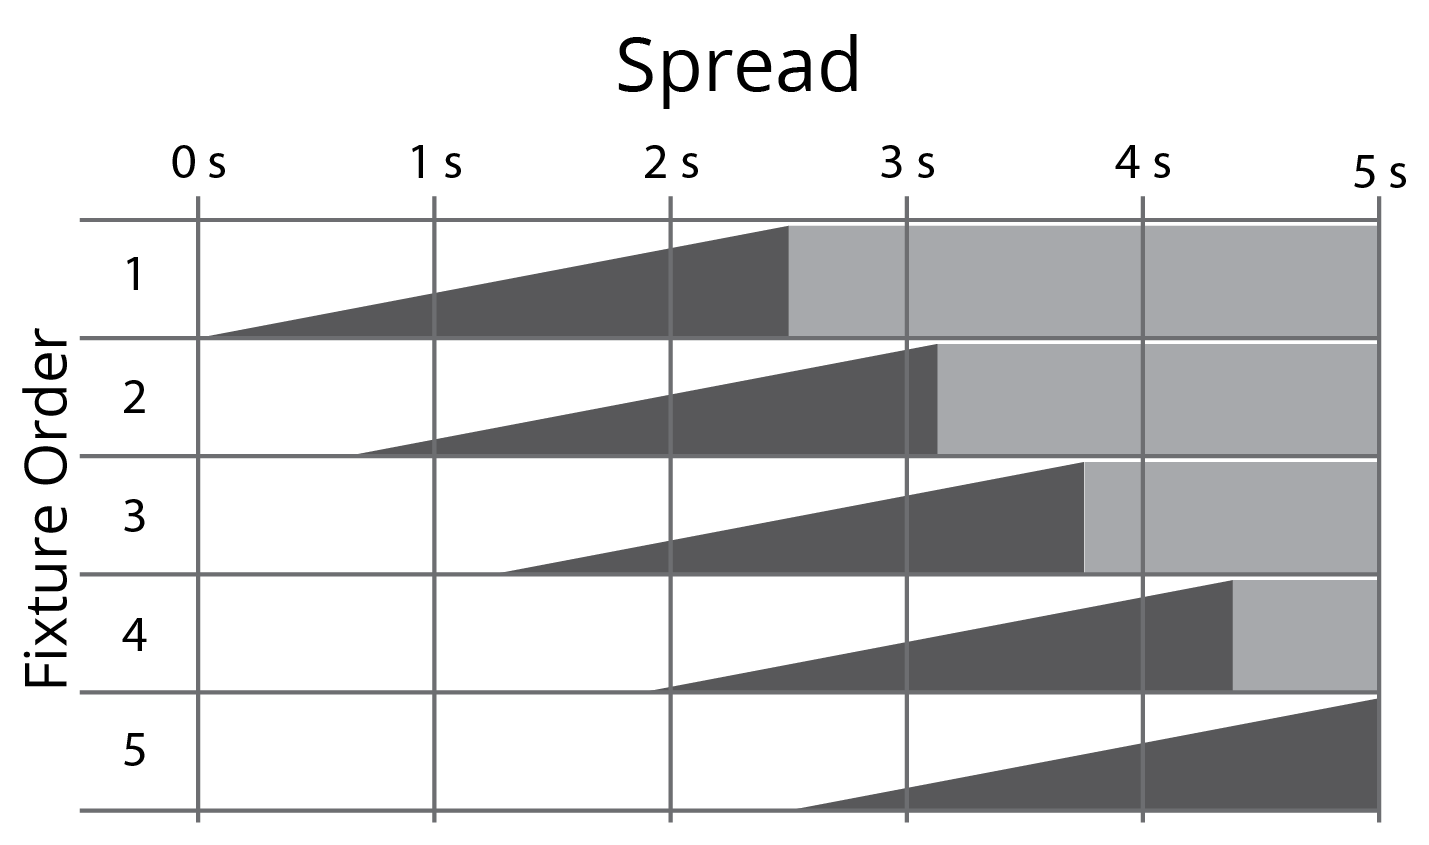
For Spread, the fade-in time for all fixtures within the affect group is equal to half the set total fade time. This, like wave, also produces an effect similar to a wipe transition, but with a broader band of fixtures that are changing at the same time (compared to Wave).
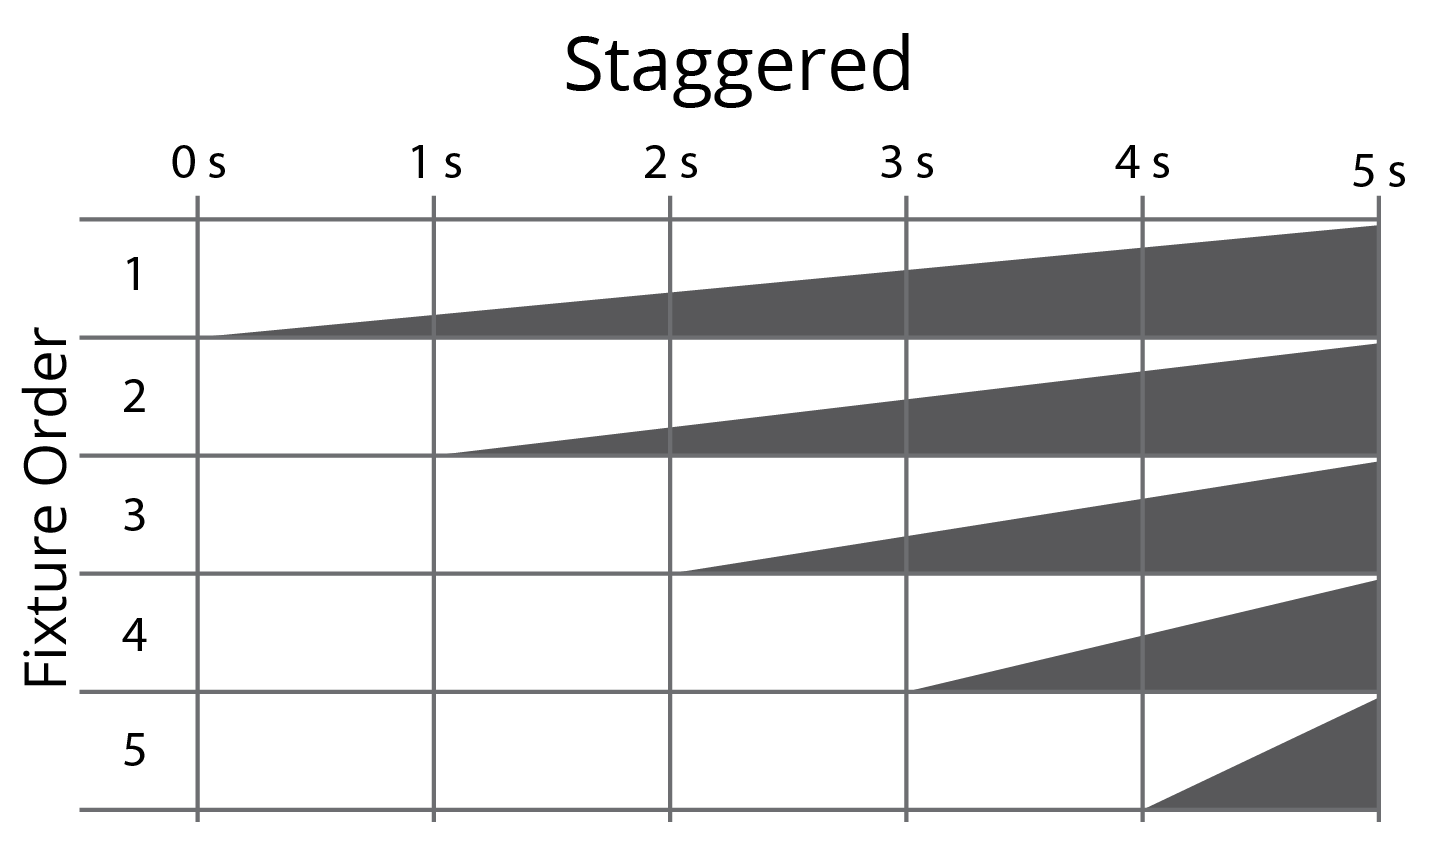
For Staggered, each fixture will start fading in turn - but they will have different fade times so that they all finish fading together. This will produce an effect that will start as a more gradual transition that appears to accelerate towards the end.
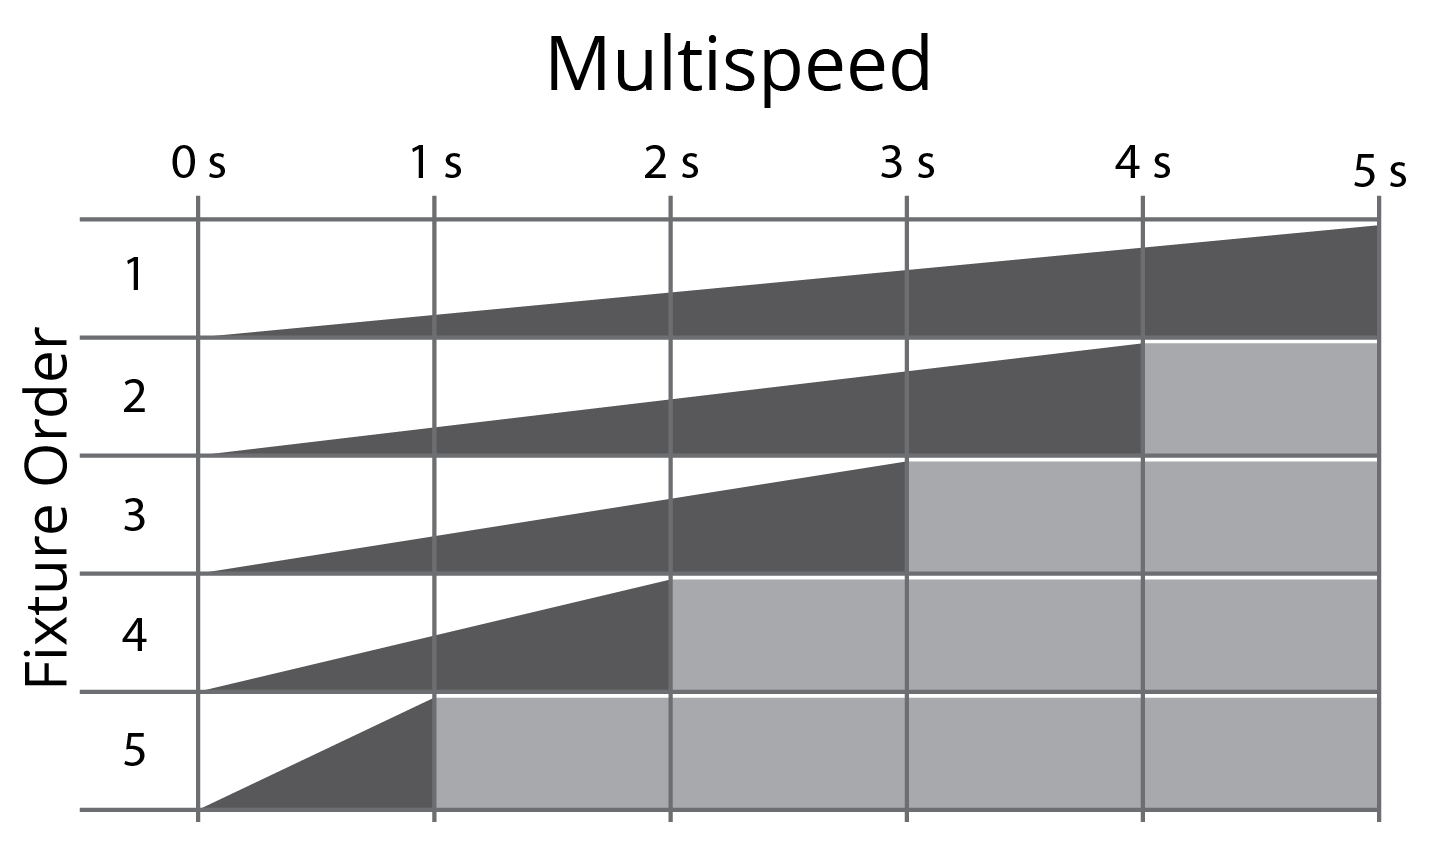
For Multispeed, all the fixtures will start fading at the same time, but fixtures at the top of the group will complete the fade more slowly than the fixtures at the end of the group (see figure below). So it will start as a rapid transition that appears to slow and linger towards the end.
NOTE: Multispeed has an opposite direction to Wave, Spread, and Staggered.
Direction
The ordering of a skewed transition depends on the fixture/element ordering within the group. The Skew Direction drop-down provides further ordering options such as Forwards and Backwards for additional flexibility. Also included are In and Out options that split the group into two halves in opposing order; In will begin at both ends of the fixture group and work the skew inwards to the middle, while Out will do the opposite, starting in the middle of the group working out to the ends. There is also a Shuffle option that applies the skew following a random order.
Additional groups can be created with different fixture/element ordering to achieve other skewed effects.
Repeat
Specifies the number of adjacent fixtures/elements over which a skewed transition is repeated, default is All meaning that the skew will span the entire selection. Typically you set this value to be equal to the number of elements in a compound fixture or the number of fixtures in a zone or on a truss, experimentation is recommended as interesting effects can be achieved.
Buddy
Specifies the number of fixtures/elements that will fade together within a skewed transition, default is 1 meaning that each fixture/element will fade independently. Set to 2 to make pairs fade together, 3 for threesomes etc. Again, experimentation recommended.

Matrix & Media presets (2D)
Skew types applied to 2D built-in presets work off of the mapping array for pixel matricies and it thus takes into consideration the location of each fixture to produce the effects.
Skew Type
Since the Pixel Matrices onto which you place Matrix and Media presets have spatial awareness, the available skews are more powerful than those for 1D built-in presets. They are akin to video wipes in their functionality. Combined with the % Fade (which describes the feathering of the transition edge) and Angle properties it is possible to obtain a variety of visual effects.
None
The default skew type is None which causes all the fixtures/elements to fade in together over the course of the fade time.
Wipe
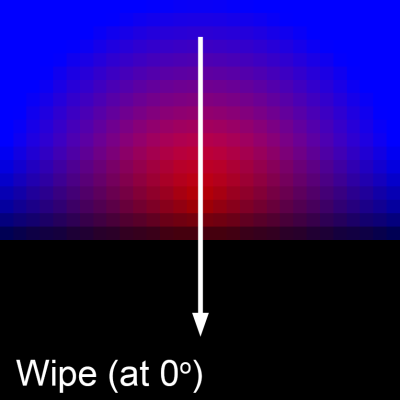
This is a wipe that fades in row by row from one side of the canvas to the opposite.
Iris Open & Close
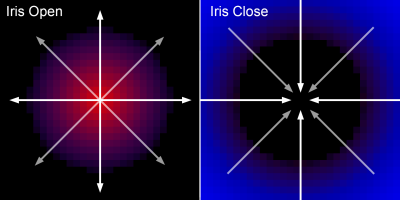
This skew type will create a radiating fade that will start from the center of the canvas and propagate outwards (Iris Open), or the opposite starting at the edges and propagating inwards to the center (Iris Close). Angle doesn't have an effect on this skew type as its effect is perpendicular to the angel.
Radial Wipe Clockwise (CW) & Counter Clockwise (CCW)
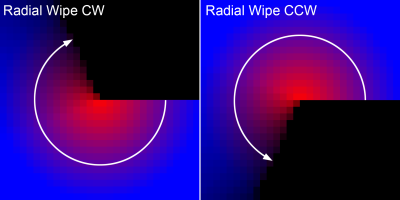
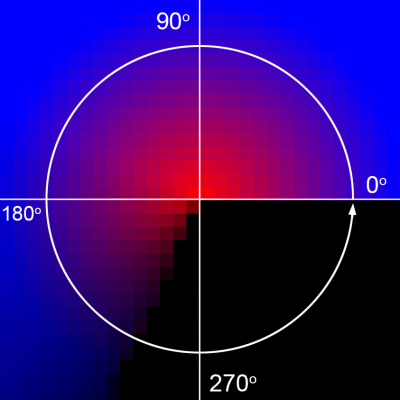
The radial wipe creates a fade wipe that propagates following a clock hand as it revolves around the center-point either clockwise, or counter clockwise. By changing the angle the point at which the wipe starts can be modified. The wipe starts at the specified angle.
Curtains Open & Close
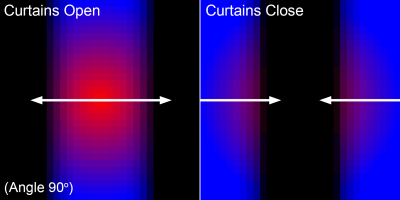
This skew type will create a fade-in revealing the content as if curtains were being opened or closed. Curtains open skew creates a fade-in begin in the middle and propagate outwards from the center, whereas the curtains close skew creates a fade-in that begins at the edges and propagates inwards. The direction of the propagation is perpendicular to the angle, so at angle = 0 the effect comes from the top and bottom.
% Fade
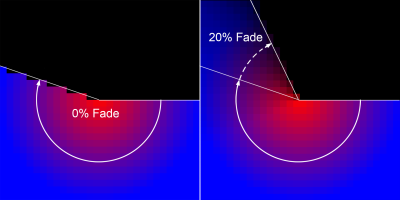
Sets the hardness of the of the transition edge for 2D skew types - akin to feathering is some image editing software. The hardness ranges from hard (0%) to soft (100%). When the % Fade is very hard the rows of fixtures will turn on one after the other in a way that creates a harsh edge. With a softer (higher than 0%) % Fade the transition smooths across more rows making it softer. See below for a representation of this effect.
NOTE: If % Fade is put to 100% (i.e. softest) the skew effect will not take place as it is the same has having it set to none.
Angle
Some skews (for example Linear or Radial Wipe) can optionally accept an angle value that alters the direction or start point of the transition.
Specifying times
Timing fields display times in the format hh:mm:ss.cc (hours:minutes:seconds.centiseconds), although leading zeros are not displayed. 24 hours (24:00:00.00) is the maximum timeline length and thus timing duration.
When setting times you can enter in this format directly (omitting leading zeros) or you can use h, m & s to specify your units and Designer will reformat accordingly. Furthermore, any number input without separators (h, m, s or :) is taken literally if it is valid as such or converted if not, here a decimal point will always denote centiseconds.
For example:
| 00:01:30.00 | 1 minute and 30 seconds | (00:01:30.00) |
| 1:30 | 1 minute and 30 seconds | (00:01:30.00) |
| 90s | 1 minute and 30 seconds | (00:01:30.00) |
| 1h2.5m | 1 hour, 2 minutes and 30 seconds | (01:02:30.00) |
| 2h7m45.5s | 2 hours, 7 minutes, 45 seconds and 50 centiseconds (half a second) | (02:07:45.50) |
| 99 | 1 minute, 39 seconds ("99" not valid so converted) | (00:01:39.00) |
| 100 | 1 minute,0 seconds ("100" valid so taken literally) | (00:01:00.00) |
| 2020 | 20 minutes, 20 second | (00:20:20.00) |
| 30.1 | 30 seconds and 10 centiseconds (tenth of a second) | (00:00:30.10) |
Precedent
The Pharos Controllers use the Latest Takes Precedent Plus (LTP+) system (popularised by Flying Pig Systems in the early 1990s) to determine what to output to a fixture (or, strictly speaking, fixture element or parameter) at playback runtime. LTP+ was an enhancement of the standard LTP system and was designed to incorporate automated lighting control. The "rules" of the LTP+ system are as follows:
- After system initialisation, and prior to any preset (on a timeline) running, the output will be in a default, "released" state. This does not mean that all DMX channels will be zero however as this default state is determined by each fixture's library definition that will set parameters to sensible "home" positions, for example pan and tilt to midway, irises and gobo/colour flags to open white.
- The output will respond to the latest preset activated regardless of the preset data (so a preset programmed to black will override a colour).
- When a preset expires or is explicitly released the output will revert to the prior state which may be an overridden preset (if any) or the default state.
- Fixture parameters are grouped by kind (Intensity, Colour, Beam Image, Beam Shape, Position & Control) and so preset programming and thus precedent operates at this level - multiple presets can thus be responsible for the output of a fixture with multiple parameter kinds e.g. a moving light or conventional fixture with a scroller.
Since the Controllers can run multiple timelines simultaneously then some consideration should be given as to how best structure the project. This is particularly important if the project calls for random triggering of timelines, for example from a Button Panel Station (BPS), since there is no way of knowing in advance what state the output will be in (i.e. which timelines have already been triggered) when a new timeline triggered. This interaction of timelines can yield unexpected results unless care is taken when programming.
